Connect with us

Blog

How to Reheat Ribs Without Drying Them Out: The Ultimate Guide

Published

on

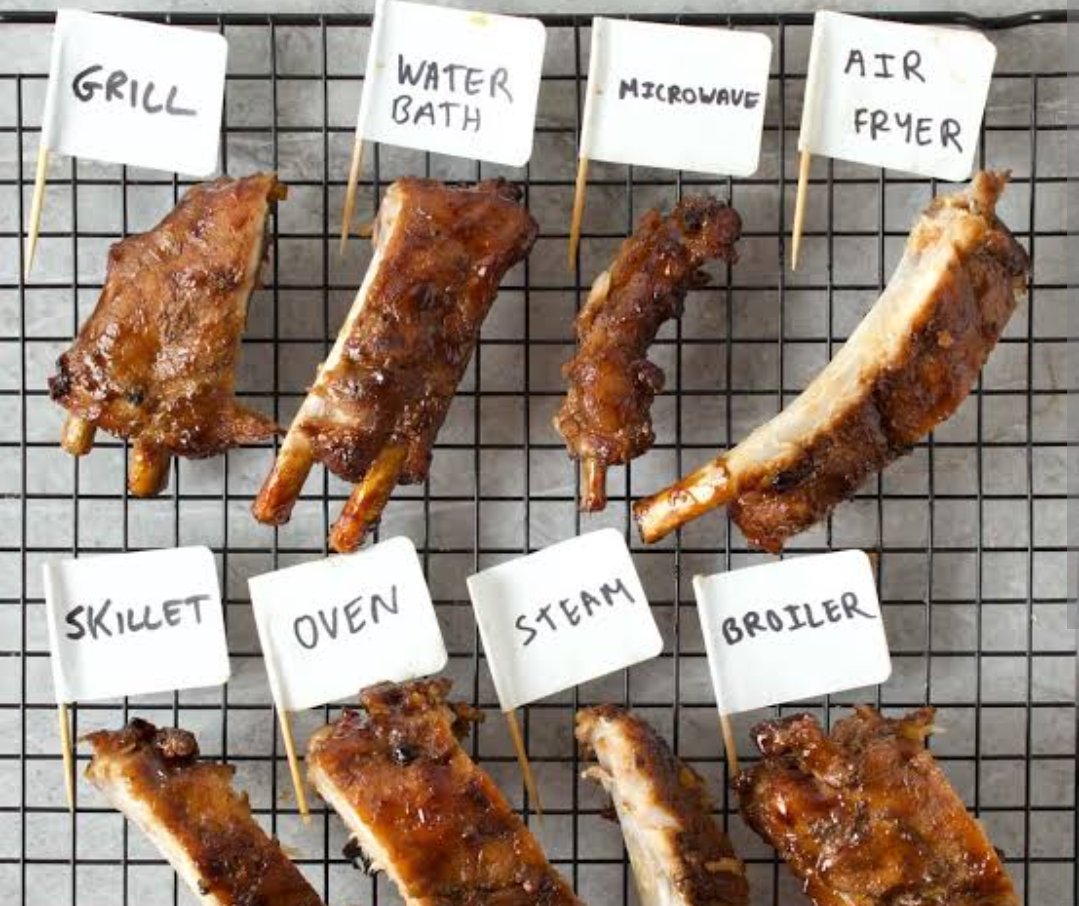
Reheating ribs can be tricky, as improper methods can result in dried-out, tough meat. Whether you have leftover baby back ribs or beef ribs, the goal is to retain their juiciness and smoky flavor. This guide will walk you through various methods to reheat ribs, ensuring they remain tender, moist, and delicious.

Why Reheating Ribs Requires Care

Ribs, especially those slow-cooked or smoked, contain a lot of connective tissue that breaks down during the cooking process. When reheated improperly, these tissues can become tough, and the meat can lose moisture. Reheating ribs with care means cooking them long enough to get to a safe temperature without drying them out.

Safe Temperature for Reheated Ribs

Before diving into the methods, it’s essential to note that reheated ribs should reach an internal temperature of 165°F (74°C) to be safe to eat. Using a meat thermometer can help ensure the ribs are fully reheated without overcooking.

1. Reheating Ribs in the Oven

Reheating in the oven is one of the most reliable methods to restore your ribs’ tenderness.

Instructions:

  1. Preheat the oven: Set the oven to 250°F (120°C).
  2. Prepare the ribs: Remove the ribs from the fridge and allow them to come to room temperature for about 30 minutes. This ensures even reheating.
  3. Wrap in foil: Place the ribs on a baking tray and tightly wrap them in aluminum foil. Adding a small amount of liquid like apple juice or water inside the foil helps prevent them from drying out.
  4. Reheat: Bake the ribs for about 20-30 minutes. For thicker ribs, you may need to check after 10 minutes and extend the heating time until the internal temperature reaches 165°F.
  5. Optional broiling: If you want to add a crispy texture, remove the foil after reheating and broil the ribs for 3-5 minutes.

This method is ideal for ribs that you want to retain their moisture without sacrificing flavor. Adding barbecue sauce before broiling can caramelize the outer layer for a sticky, delicious finish.

2. Reheating Ribs on the Grill

If you love the smoky flavor, reheating ribs on the grill is a great option. This method adds a fresh char and locks in moisture if done properly.

Instructions:

  1. Preheat the grill: Set your gas or charcoal grill to medium heat (around 225°F).
  2. Wrap in foil: Coat the ribs with barbecue sauce and wrap them in two layers of foil to retain moisture.
  3. Reheat with indirect heat: Place the ribs on the grill’s cooler side to avoid direct heat. Close the lid and heat the ribs for 10-15 minutes.
  4. Crisp over direct heat: Remove the ribs from the foil and place them directly over the heat for 5-10 minutes, turning frequently to prevent burning.

This method enhances the smoky flavor and ensures crispy, caramelized ribs, perfect for outdoor barbecues or casual gatherings.

3. Using the Sous Vide Method

Sous vide is a precise method of reheating ribs without drying them out. While it lacks the crispy texture, it guarantees fall-off-the-bone tenderness.

Instructions:

  1. Seal the ribs: Place the ribs in a vacuum-sealed or resealable plastic bag, ensuring there’s no air inside.
  2. Heat the water bath: Set your sous vide machine to 150°F. For stovetop setups, use a thermometer to monitor the temperature.
  3. Cook the ribs: Submerge the sealed ribs in the water bath and cook for 45-60 minutes, depending on their thickness.
  4. Optional crisping: After removing the ribs from the water bath, crisp them up under a broiler or on a grill for a few minutes.

Sous vide is ideal for people who prioritize moisture retention, as it prevents overcooking and allows you to control the exact temperature.

4. Reheating Ribs in the Microwave (For Quick Fixes)

While the microwave is not the best method, it can be convenient when you’re in a hurry. However, it often results in dry ribs, so follow these steps to minimize moisture loss.

Instructions:

  1. Prepare the ribs: Place the ribs in a microwave-safe dish and cover them with a damp paper towel.
  2. Set to medium heat: Reheat the ribs in 30-second intervals to avoid overcooking.
  3. Check for temperature: Make sure the internal temperature reaches 165°F.

Though not ideal for preserving texture, this method works when you need a quick meal. Be sure to slather on extra sauce to retain moisture.

5. Reheating Ribs in an Air Fryer

The air fryer is a great option for those who want crispy ribs in less time than the oven or grill.

Instructions:

  1. Preheat the air fryer: Set the air fryer to 350°F.
  2. Reheat the ribs: Place the ribs in a single layer inside the basket and reheat for 5-10 minutes, flipping halfway through.
  3. Serve: Check for an internal temperature of 165°F before serving.

The air fryer gives ribs a crisp exterior without drying them out, making it one of the fastest methods with satisfying results.

Tips for Best Results

  • Thaw frozen ribs: If your ribs are frozen, always thaw them in the refrigerator overnight before reheating.
  • Add moisture: Wrapping ribs in foil with a splash of liquid (apple juice or broth) helps retain moisture during the reheating process.
  • Check temperature: Always use a meat thermometer to ensure your ribs have reached a safe internal temperature.
  • Rest before serving: Allow reheated ribs to rest for a few minutes to let the juices redistribute.

Conclusion

Reheating ribs can be a simple process if done correctly, ensuring that you enjoy leftovers that are just as delicious as when they were first served. Whether you prefer the oven, grill, or air fryer, each method provides a way to keep your ribs moist, tender, and flavorful. Choose the method that best suits your time, equipment, and desired outcome, and don’t forget to slather on extra barbecue sauce for added flavor!

Continue Reading
Click to comment

Leave a Reply

Your email address will not be published. Required fields are marked *

Blog

How to Measure Folchis – A Comprehensive Guide

This blog has provided a comprehensive analysis of “Folchis how to measure,” covering everything from the tools and techniques involved to best practices for accuracy. Accurate Folchis measurement is a crucial skill that, when mastered, can significantly improve your work across various industries and applications.

Published

on

1. Introduction to Folchis

Folchis measurement is a specialized task that requires precision and knowledge about specific methodologies and tools. Understanding how to measure Folchis effectively can significantly improve the outcomes of projects or analyses where these measurements are essential. This blog aims to provide an in-depth analysis of how to measure Folchis, exploring the tools, techniques, and strategies to ensure accuracy.

Folchis, though a niche subject, plays a significant role in certain technical fields. However, if you are new to the concept or need more clarity on its measurement, this guide will walk you through everything you need to know.

2. Understanding Folchis and Their Importance

Before diving into the “how” of measuring Folchis, it is important to understand what Folchis are and why they matter.

Folchis are units or entities used to measure a particular aspect in a given domain, often related to complex structures, objects, or environmental factors. The nature of what constitutes a “Folchis” varies, but it typically refers to something quantifiable and measurable in a scientific or technical context.

Folchis measurements are commonly applied in fields like engineering, environmental science, or data analysis, where accurate measurements are critical for decision-making, safety assessments, and system designs.

3. Why Measuring Folchis is Crucial

Measuring Folchis is vital for several reasons, particularly because it helps professionals ensure the accuracy and reliability of their work. Some reasons why measuring Folchis is crucial include:

  • Precision in Project Execution: In industries like engineering or architecture, knowing how to measure Folchis ensures projects are executed with the correct specifications, reducing the likelihood of costly mistakes.
  • Improved Data Accuracy: In scientific research, accurate Folchis measurements contribute to the reliability of data, ensuring experiments or studies are based on sound metrics.
  • Risk Management: Accurate measurement of Folchis can help in identifying potential risks or issues in systems, structures, or environments, allowing for preemptive solutions.
  • Optimization: Folchis measurements often inform optimization processes, enabling professionals to enhance performance, efficiency, or safety.

Without properly understanding and measuring Folchis, there can be miscalculations, leading to project failures, safety hazards, and inefficient use of resources.

4. Tools and Techniques for Measuring Folchis

Measuring Folchis requires the right tools and techniques. Depending on what the Folchis represents in a given context, you may need a range of equipment to ensure accuracy.

a. Measuring Instruments

  1. Calipers: These are precise instruments used for measuring the dimensions of objects, particularly useful for small-scale Folchis.
  2. Tape Measures: For larger Folchis that need to be measured in terms of length, width, or height, tape measures provide a simple yet effective tool.
  3. Laser Distance Measurers: When extreme accuracy over long distances is required, laser distance measurers can help professionals measure Folchis with minimal error.
  4. Micrometers: These are highly specialized tools used for measuring very small Folchis, often at the microscopic or nanoscopic level.
  5. GPS Systems: In certain cases, when measuring geographic or spatial Folchis, Global Positioning Systems (GPS) can be employed for exact positioning and measurements.

b. Techniques for Measuring Folchis

  1. Direct Measurement: This involves physically measuring the Folchis using tools like calipers, rulers, or tape measures. It’s the most straightforward technique when dealing with tangible objects.
  2. Indirect Measurement: In some cases, it may be difficult to measure Folchis directly due to the size, shape, or inaccessibility of the object. Techniques such as triangulation or mathematical modeling might be used in these instances.
  3. Digital Measurement Systems: With the advancement of technology, many measurements of Folchis can be taken using digital tools and software, which increase precision and reduce human error.

5. Step-by-Step Guide on How to Measure Folchis

To measure Folchis effectively, it is important to follow a structured approach. Below is a step-by-step guide to help you get accurate results:

Step 1: Identify the Type of Folchis

Understanding the specific nature of the Folchis you’re measuring is crucial. Determine whether it is a physical dimension, a system attribute, or an environmental factor. This will guide you in selecting the appropriate measurement tools.

Step 2: Select the Right Tools

Once you know what needs to be measured, select the appropriate measuring instruments. If the Folchis is small and requires precision, opt for calipers or micrometers. For larger measurements, laser distance measurers or tape measures might be more appropriate.

Step 3: Calibrate Your Instruments

Before you begin measuring, ensure that your tools are properly calibrated. Uncalibrated instruments can lead to incorrect measurements, so it’s important to check and adjust them as necessary.

Step 4: Take Preliminary Measurements

If possible, take preliminary measurements to ensure you’re using the right approach. This can help identify any potential issues before proceeding with the full measurement.

Step 5: Measure and Record

Using the selected tool, carefully measure the Folchis. Pay attention to precision and record the values immediately to avoid any data loss. It’s often helpful to take multiple measurements and then calculate the average to minimize any outliers or errors.

Step 6: Verify Accuracy

After taking measurements, compare them against reference values or expected results to ensure they are accurate. If there are discrepancies, reassess the measuring technique and tools used.

Step 7: Document the Results

Once you’ve completed the measurement process, document the results in a systematic manner. This may involve creating graphs, reports, or databases that accurately reflect the findings.

6. Challenges in Measuring Folchis

While measuring Folchis may seem straightforward, there are several challenges that professionals often face:

  • Inaccessibility: Some Folchis may be difficult to reach, making direct measurements challenging.
  • Environmental Factors: External conditions like temperature, humidity, or lighting can affect the accuracy of measurements.
  • Tool Limitations: The measuring instruments themselves may have limitations in terms of precision or scope.
  • Human Error: Mistakes in reading instruments, recording values, or calculating results can lead to inaccuracies.

To overcome these challenges, it’s important to carefully plan the measurement process and use the most appropriate tools and methods for the specific scenario.

7. Best Practices for Accurate Folchis Measurement

To ensure the most accurate measurements, follow these best practices:

  • Calibrate Instruments Regularly: Always ensure your measuring tools are calibrated before each use.
  • Use Multiple Measurement Methods: Whenever possible, use more than one method or tool to verify results.
  • Consider Environmental Conditions: Adjust your measurement approach to account for environmental factors that could skew results.
  • Minimize Human Error: Be diligent when taking measurements, double-check values, and use technology to reduce the risk of manual errors.
  • Take Multiple Measurements: Taking multiple readings and averaging the results can help eliminate outliers and ensure greater accuracy.

8. Interpreting Folchis Measurements

Once the measurements have been taken, interpreting the data is the next crucial step. Interpreting Folchis measurements requires understanding the context in which they were taken and what the results imply for the specific field of work.

Key Considerations:

  • Benchmarks: Compare your measurements with industry or project benchmarks to assess whether the results are within acceptable ranges.
  • Tolerance Levels: In fields like engineering, it’s important to know the tolerance levels for Folchis measurements. Slight deviations may be acceptable, while larger variances could signal problems.
  • Trends and Patterns: Analyze the measurements over time to identify any trends or patterns. This can provide valuable insights into the stability or variability of the object or system being measured.

9. Conclusion

Measuring Folchis requires careful attention to detail, the use of appropriate tools, and an understanding of the challenges involved. Whether you’re working in engineering, data analysis, or environmental science, the ability to accurately measure Folchis is essential for ensuring the success and reliability of your work.

By following the steps outlined in this guide and adhering to best practices, you can ensure that your Folchis measurements are accurate and meaningful. The right approach will help you avoid errors, interpret data effectively, and ultimately contribute to better decision-making and project outcomes.

Continue Reading

Blog

How is Crissi Patakis? Understanding her Impact and Influence

Published

on

Crissi Patakis has emerged as a significant figure in the realm of spiritual teachings, humanitarian work, and personal empowerment. Much like her sibling Corina Pataki, who is known for her transformative spiritual guidance and books like The Quest for Truth, Crissi plays a parallel role in elevating others to explore deeper levels of consciousness, purpose, and self-awareness.

Spiritual and Humanitarian Contributions

Crissi Patakis is deeply embedded in the world of spirituality, where she blends practical wisdom with a passion for healing. Much of her work revolves around empowering individuals to realize their potential and transcend their limitations through conscious living. Her contributions, although less publicized than Corina’s, have been meaningful in helping people find personal growth paths.

The teachings of Crissi focus on encouraging spiritual ascension, a concept heavily discussed in various spiritual communities. Spiritual ascension typically refers to the process of becoming more aware of one’s soul purpose, often described as the journey from ignorance to enlightenment. This idea is also embraced by her sister Corina Pataki, who shares insights on the subject through podcasts and speaking engagements.

Sisterly Influence: Corina and Crissi Patakis

Though Crissi may not have as many published works or a widespread public profile, her association with Corina’s spiritual ventures positions her as a significant contributor to the spiritual wellness movement. Together, they contribute to a holistic vision that blends personal empowerment with a deeper connection to the universe. Corina, for instance, offers sessions and workshops on “Quantum Memory Retrieval,” which aim to help individuals unlock their subconscious memories and find healing. This shared ideology often places Crissi in a supportive role within this holistic spiritual approach.

Navigating the Digital Age of Spiritual Guidance

As with many spiritual leaders today, Crissi Patakis has embraced digital platforms to spread her message. Though her personal contributions are not as highlighted as Corina’s extensive online presence, her influence can still be traced in collaborative work and in shared initiatives like podcasts or humanitarian missions. These platforms allow her to engage a global audience seeking alternative methods of self-improvement and enlightenment.

The Patakis sisters’ message of spiritual ascension reflects the growing trend of individuals seeking non-traditional pathways to self-fulfillment. In today’s fast-paced digital world, this often translates to holistic programs, online workshops, and collaborative spiritual efforts that harness the power of community to create lasting change.

Crissi’s Role in Charitable Work

Besides her spiritual teachings, Crissi Patakis also actively engages in humanitarian causes. This aligns with the core philosophy shared by many contemporary spiritual leaders— that personal spiritual enlightenment must extend to helping others. By emphasizing compassion, empathy, and service, Crissi has likely inspired others to contribute to social causes and philanthropic efforts.

Her involvement in humanitarian missions showcases a deep commitment to addressing worldly challenges, grounding spiritual teachings in practical ways that help communities in need. This is where her work differentiates slightly from Corina’s, as Crissi’s focus leans toward community support and outreach, reinforcing her spiritual teachings with tangible, charitable work.

Conclusion: Crissi Patakis’ Subtle Yet Powerful Influence

While Crissi Patakis might not be as widely known or prolific in terms of authored works, her spiritual guidance, aligned with Corina Pataki’s, plays a significant role in fostering personal transformation. Through her humanitarian efforts, digital engagements, and close association with Corina’s teachings, she contributes to a growing community of individuals seeking spiritual growth and collective ascension.

Crissi’s work represents the modern shift toward accessible spiritual education, where figures like her guide communities both locally and globally through personal empowerment, charity, and conscious living.

Continue Reading

Blog

How Big Is an 8×10? A Complete Guide to Understanding Dimensions and Usage

Published

on

By

The 8×10 inch dimension is one of the most commonly used photo sizes, whether for personal prints, framing, or display purposes. To fully grasp its versatility, let’s explore the size in different measurement units, its uses, and why it remains a popular choice for photographers and decorators alike.

Dimensions of an 8×10 Photo

An 8×10 photo measures exactly 8 inches wide by 10 inches tall in portrait orientation. This equates to:

  • In centimeters (cm): 20.32 cm by 25.4 cm
  • In millimeters (mm): 203.2 mm by 254 mm
  • In feet: 0.67 feet by 0.83 feet

While these dimensions remain consistent across the world, they are usually referred to in inches due to the standardization in photo and print sizing.

Pixel Dimensions for Web and Print

When working with digital images, pixels are the critical factor that influences print and display quality. For an 8×10 photo, pixel dimensions vary depending on the resolution (PPI or DPI) you choose:

  • For web use (72 PPI): 576 x 720 pixels. This resolution is typical for images displayed online, where high detail isn’t necessary.
  • For medium-quality prints (180 PPI): 1440 x 1800 pixels. This is suitable for personal printing and basic photo albums.
  • For high-quality prints (300 PPI): 2400 x 3000 pixels. A 300 PPI resolution delivers sharper, more detailed images, making it ideal for professional prints.

Aspect Ratio and Orientation

The aspect ratio of an 8×10 photo is 4:5, meaning the image is slightly taller than it is wide. This ratio is particularly favored for portrait photography because it naturally aligns with the human form, making it a go-to choice for headshots and framed prints. Interestingly, while an 8×10 is vertical (portrait orientation), a 10×8 photo flips these dimensions, making it horizontal (landscape orientation).

Common Uses of 8×10 Photos

Thanks to its versatile size, 8×10 photos are used in various contexts, including:

  1. Portrait Photography: Many photographers prefer this size for formal headshots, especially for actors, models, and professionals who need high-quality prints for portfolios and resumes.
  2. Event Photography: At weddings, corporate events, and parties, 8×10 prints are often provided as keepsakes. They are large enough to capture significant details while still being easy to display.
  3. Home Décor and Framing: An 8×10 print is perfect for framing cherished memories, such as family portraits or travel photos. This size is often part of gallery walls or standalone decorative displays in homes.
  4. Wall Art: For decorators, the 8×10 photo serves as a visual accent, adding a personal touch to any space. It can be placed with larger or smaller frames in a collection to create an appealing aesthetic.

Comparison to Other Photo Sizes

To better understand the relative size of an 8×10 photo, let’s compare it to other standard photo dimensions:

  • 4×6: A much smaller size, often used for casual snapshots or wallet-sized prints.
  • 5×7: A middle-ground size, balancing detail and display quality, but still smaller than 8×10.
  • 11×14: Larger and better suited for detailed artwork or professional portraits, typically used in bigger spaces.
  • 16×20: This size is twice as large as an 8×10 and is often used for dramatic wall art.

The Importance of Resolution for Printing

When printing an 8×10 photo, resolution is crucial to ensure sharpness and clarity. For everyday photo albums, a resolution of 180 PPI (pixels per inch) will suffice, providing decent detail without pixelation. However, for gallery-quality or professional prints, 300 PPI is recommended, giving you a high-quality output with crisp edges and refined detail.

Framing Considerations

When it comes to framing an 8×10 photo, there are a few things to keep in mind. The frame size itself is often larger than the photo, especially if there is a mat included. A standard frame for an 8×10 picture could measure 10×12 inches or more, depending on the thickness of the mat and frame. Many off-the-shelf frames are designed to accommodate this popular size, which means you can easily find affordable framing solutions.

Why Choose an 8×10 Size?

An 8×10 photo strikes a balance between being large enough to display prominent details and small enough to fit most spaces comfortably. It is a standard size, making it easy to print, frame, and display. Additionally, its aspect ratio works well for a wide range of subjects, from portrait photography to event documentation.

Conclusion

The 8×10 photo size is one of the most versatile and popular dimensions used for both personal and professional purposes. Whether for a family portrait, a professional headshot, or a decorative print, this size offers a perfect balance between visual impact and practical display. Its standard aspect ratio, wide availability, and range of uses make it a reliable choice for photographers, designers, and anyone looking to preserve their memories in style.

Continue Reading

Trending